没事干我就学开发,嘿嘿嘿 
SpringMVC
0x01 回顾MVC
- MVC是模型(Model)、视图(View)、控制器(Controller)的简写,是一种软件设计规范。
- 是将业务逻辑、数据、显示分离的方法来组织代码。
- MVC主要作用是降低了视图与业务逻辑间的双向偶合。
- MVC不是一种设计模式,MVC是一种架构模式。当然不同的MVC存在差异。
Model(模型):数据模型,提供要展示的数据,因此包含数据和行为,可以认为是领域模型或JavaBean组件(包含数据和行为),不过现在一般都分离开来:Value Object(数据Dao) 和 服务层(行为Service)。也就是模型提供了模型数据查询和模型数据的状态更新等功能,包括数据和业务。
View(视图):负责进行模型的展示,一般就是我们见到的用户界面,客户想看到的东西。
Controller(控制器):接收用户请求,委托给模型进行处理(状态改变),处理完毕后把返回的模型数据返回给视图,由视图负责展示。 也就是说控制器做了个调度员的工作。
最典型的MVC就是JSP + servlet + javabean的模式。
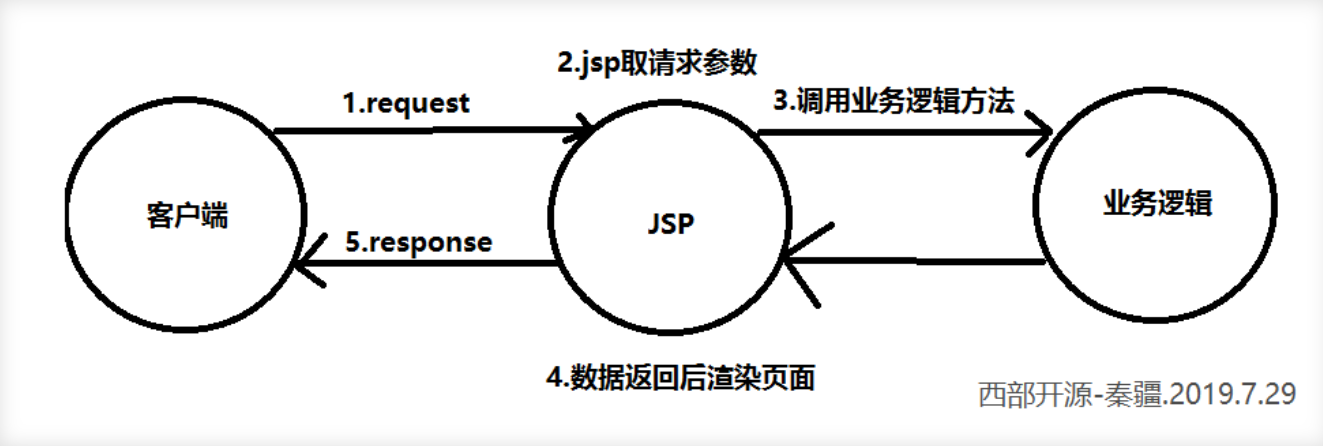
Model1时代
- 在web早期的开发中,通常采用的都是Model1。
- Model1中,主要分为两层,视图层和模型层。
Model1优点:架构简单,比较适合小型项目开发;
Model1缺点:JSP职责不单一,职责过重,不便于维护;
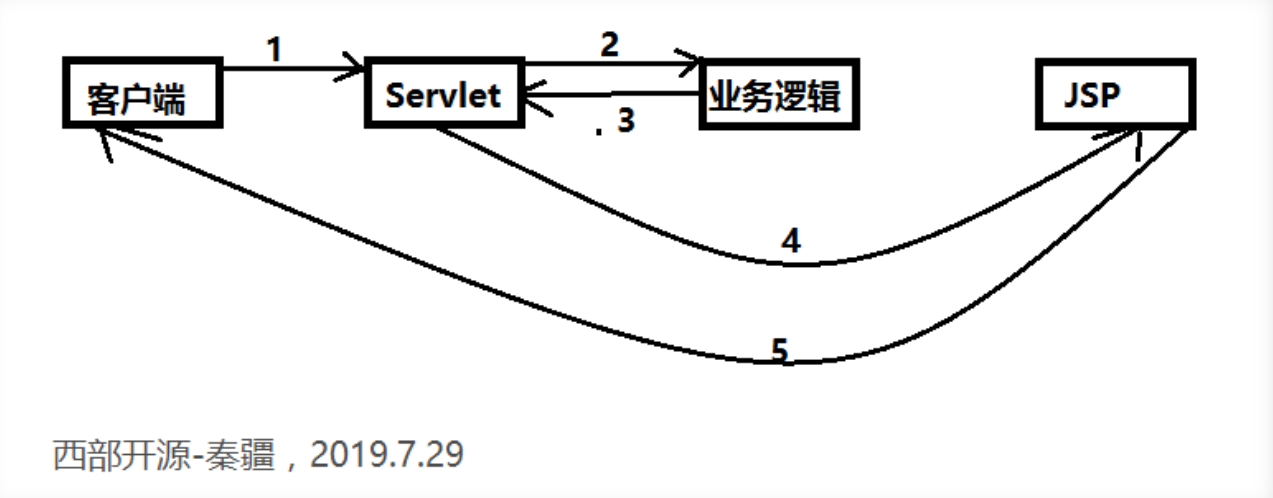
Model2时代
Model2 把一个项目分成三部分,包括视图、控制、模型。
- 用户发请求
- Servlet接收请求数据,并调用对应的业务逻辑方法
- 业务处理完毕,返回更新后的数据给servlet
- servlet转向到JSP,由JSP来渲染页面
- 响应给前端更新后的页面
职责分析:
Controller:控制器
- 取得表单数据
- 调用业务逻辑
- 转向指定的页面
Model:模型
- 业务逻辑
- 保存数据的状态
View:视图
- 显示页面
Model2这样不仅提高的代码的复用率与项目的扩展性,且大大降低了项目的维护成本。Model 1模式的实现比较简单,适用于快速开发小规模项目,Model1中JSP页面身兼View和Controller两种角色,将控制逻辑和表现逻辑混杂在一起,从而导致代码的重用性非常低,增加了应用的扩展性和维护的难度。Model2消除了Model1的缺点。
MVC框架要做哪些事情
- 将url映射到java类或java类的方法 .
- 封装用户提交的数据 .
- 处理请求—调用相关的业务处理—封装响应数据 .
- 将响应的数据进行渲染 . jsp / html 等表示层数据 .
说明:
常见的服务器端MVC框架有:Struts、Spring MVC、ASP.NET MVC、Zend Framework、JSF;常见前端MVC框架:vue、angularjs、react、backbone;由MVC演化出了另外一些模式如:MVP、MVVM 等等….
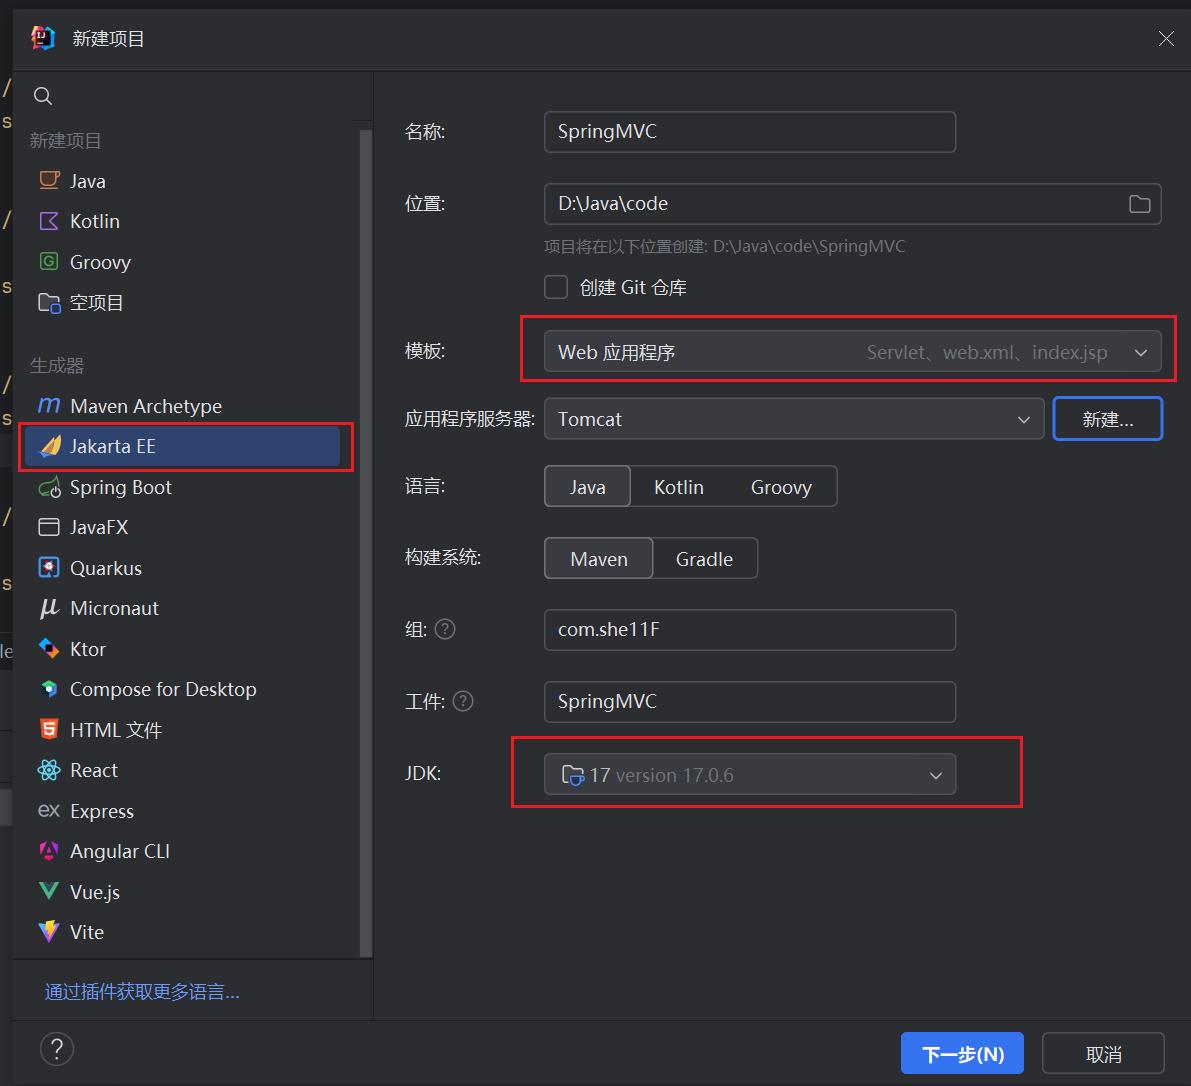
0x02 配置环境并搭建项目
这里我们继续使用之前的Tomcat10服务器,Spring6之后要求必须使用Tomcat10或更高版本,跟之前一样,我们直接创建一个新的JakartaEE项目,java8 也可以,不过都 spring6 了还是体验一下 java17 吧。
传统XML配置形式
SpringMvc项目依然支持多种配置形式,这里我们首先讲解最传统的XML配置形式。
首先我们需要添加Mvc相关依赖:
1
2
3
4
5
| <dependency>
<groupId>org.springframework</groupId>
<artifactId>spring-webmvc</artifactId>
<version>6.0.10</version>
</dependency>
|
接着我们需要配置一下web.xml,将DispatcherServlet替换掉Tomcat自带的Servlet,这里url-pattern需要写为/,即可完成替换:
1
2
3
4
5
6
7
8
9
10
11
12
13
14
| <?xml version="1.0" encoding="UTF-8"?>
<web-app xmlns="https://jakarta.ee/xml/ns/jakartaee"
xmlns:xsi="http://www.w3.org/2001/XMLSchema-instance"
xsi:schemaLocation="https://jakarta.ee/xml/ns/jakartaee https://jakarta.ee/xml/ns/jakartaee/web-app_5_0.xsd"
version="5.0">
<servlet>
<servlet-name>mvc</servlet-name>
<servlet-class>org.springframework.web.servlet.DispatcherServlet</servlet-class>
</servlet>
<servlet-mapping>
<servlet-name>mvc</servlet-name>
<url-pattern>/</url-pattern>
</servlet-mapping>
</web-app>
|
接着需要为整个Web应用程序配置一个Spring上下文环境(也就是容器),因为SpringMVC是基于Spring开发的,它直接利用Spring提供的容器来实现各种功能,那么第一步依然跟之前一样,需要编写一个配置文件:
1
2
3
4
5
6
| <?xml version="1.0" encoding="UTF-8"?>
<beans xmlns="http://www.springframework.org/schema/beans"
xmlns:xsi="http://www.w3.org/2001/XMLSchema-instance"
xsi:schemaLocation="http://www.springframework.org/schema/beans
https://www.springframework.org/schema/beans/spring-beans.xsd">
</beans>
|
接着我们需要为DispatcherServlet配置一些初始化参数来指定刚刚创建的配置文件:
1
2
3
4
5
6
7
8
9
| <servlet>
<servlet-name>mvc</servlet-name>
<servlet-class>org.springframework.web.servlet.DispatcherServlet</servlet-class>
<init-param>
<param-name>contextConfigLocation</param-name>
<param-value>classpath:application.xml</param-value>
</init-param>
</servlet>
|
这样我们就完成了基本的配置,现在我们可以来测试一下是否配置正确,我们删除项目自带的Servlet类,创建一个Mvc中使用的Controller类,现在还没学没关系,跟着写就行了,这里我们只是测试一下:
1
2
3
4
5
6
7
8
| @Controller
public class HelloController {
@ResponseBody
@RequestMapping("/")
public String hello(){
return "HelloWorld!";
}
}
|
接着我们需要将这个类注册为Bean才能正常使用,我们来编写一下Spring的配置文件,这里我们直接配置包扫描,XML下的包扫描需要这样开启:
1
2
3
4
5
6
7
8
9
| <?xml version="1.0" encoding="UTF-8"?>
<beans xmlns="http://www.springframework.org/schema/beans"
xmlns:xsi="http://www.w3.org/2001/XMLSchema-instance"
xmlns:context="http://www.springframework.org/schema/context"
xsi:schemaLocation="http://www.springframework.org/schema/beans
https://www.springframework.org/schema/beans/spring-beans.xsd http://www.springframework.org/schema/context https://www.springframework.org/schema/context/spring-context.xsd">
<context:component-scan base-package="com.example"/>
</beans>
|
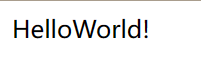
如果可以成功在浏览器中出现HelloWorld则说明配置成功(记得把 index.jsp 删掉):
全注解配置形式
如果你希望完完全全丢弃配置文件,使用纯注解开发,可以直接添加一个类,Tomcat会在类路径中查找实现ServletContainerInitializer 接口的类,如果发现的话,就用它来配置Servlet容器,Spring提供了这个接口的实现类 SpringServletContainerInitializer , 通过@HandlesTypes(WebApplicationInitializer.class)设置,这个类反过来会查找实现WebApplicationInitializer 的类,并将配置的任务交给他们来完成,因此直接实现接口即可:
1
2
3
4
5
6
7
8
9
10
11
12
13
14
15
16
17
| public class MainInitializer extends AbstractAnnotationConfigDispatcherServletInitializer {
@Override
protected Class<?>[] getRootConfigClasses() {
return new Class[]{WebConfiguration.class};
}
@Override
protected Class<?>[] getServletConfigClasses() {
return new Class[0];
}
@Override
protected String[] getServletMappings() {
return new String[]{"/"};
}
}
|
接着我们需要再配置类中添加一些必要的注解:
1
2
3
4
5
| @Configuration
@EnableWebMvc
@ComponentScan("com.shellf.controller")
public class WebConfiguration {
}
|
这样我们同样可以正常访问:
之后为了方便,我们就统一使用全注解形式编写。
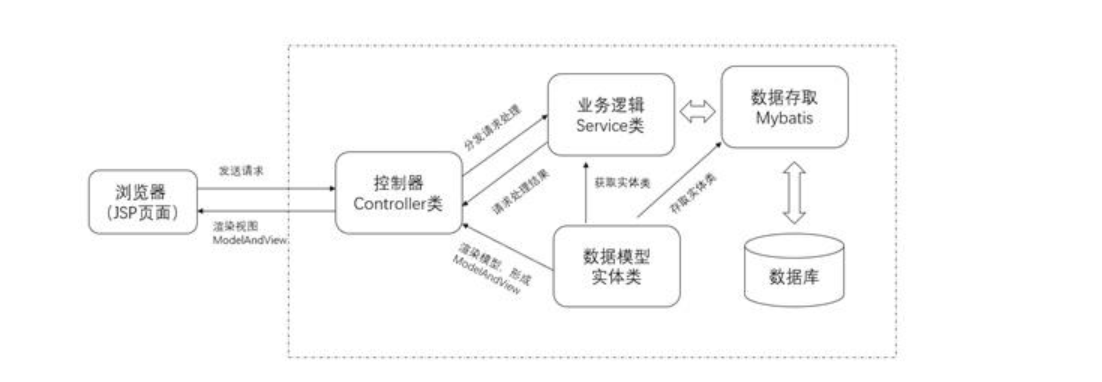
0x03 Controller控制器
有了 SpringMVC 之后,我们不必再像之前那样一个请求地址创建一个 Servlet 了,它使用 DispatcherServlet 替代 Tomcat 为我们提供的默认的静态资源 Servlet,也就是说,现在所有的请求(除了jsp,因为Tomcat还提供了一个jsp的Servlet)都会经过DispatcherServlet进行处理。
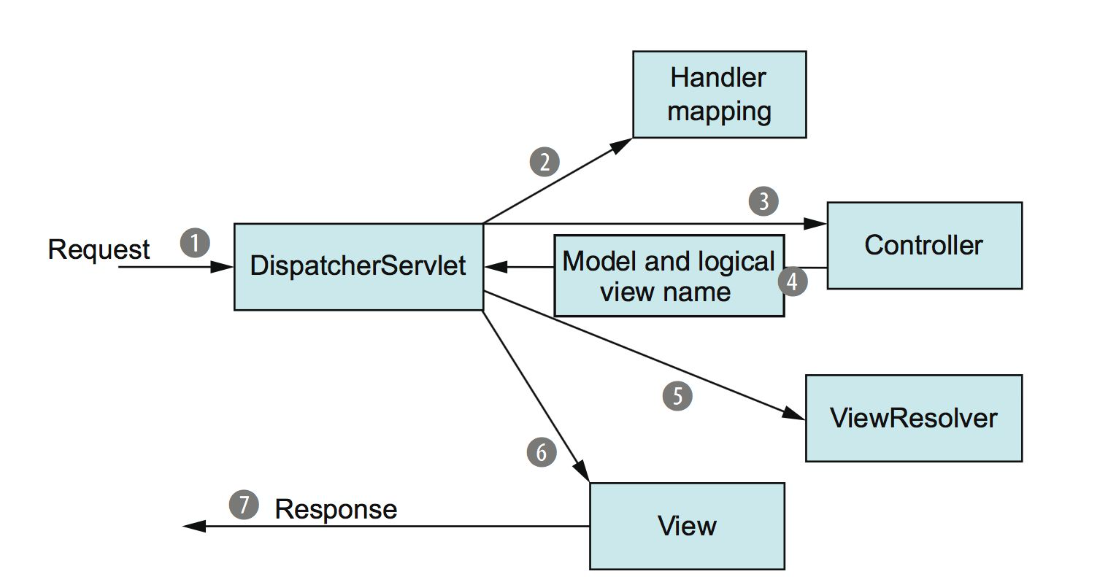
那么DispatcherServlet会帮助我们做什么呢?
根据图片我们可以了解,我们的请求到达Tomcat服务器之后,会交给当前的Web应用程序进行处理,而 SpringMVC 使用DispatcherServlet来处理所有的请求,也就是说它被作为一个统一的访问点,所有的请求全部由它来进行调度。
当一个请求经过DispatcherServlet之后,会先走HandlerMapping,它会将请求映射为HandlerExecutionChain,依次经过HandlerInterceptor有点类似于之前我们所学的过滤器,不过在SpringMVC中我们使用的是拦截器,然后再交给HandlerAdapter,根据请求的路径选择合适的控制器进行处理,控制器处理完成之后,会返回一个ModelAndView对象,包括数据模型和视图,通俗的讲就是页面中数据和页面本身(只包含视图名称即可)。
返回ModelAndView之后,会交给ViewResolver(视图解析器)进行处理,视图解析器会对整个视图页面进行解析,SpringMVC自带了一些视图解析器,但是只适用于JSP页面,我们也可以像之前一样使用Thymeleaf作为视图解析器,这样我们就可以根据给定的视图名称,直接读取HTML编写的页面,解析为一个真正的View。
解析完成后,就需要将页面中的数据全部渲染到View中,最后返回给DispatcherServlet一个包含所有数据的成形页面,再响应给浏览器,完成整个过程。
因此,实际上整个过程我们只需要编写对应请求路径的的Controller以及配置好我们需要的ViewResolver即可,之后还可以继续补充添加拦截器,而其他的流程已经由SpringMVC帮助我们完成了。
配置视图解析器和控制器
首先我们需要实现最基本的页面解析并返回,第一步就是配置视图解析器,这里我们使用Thymeleaf为我们提供的视图解析器,导入需要的依赖:
1
2
3
4
5
| <dependency>
<groupId>org.thymeleaf</groupId>
<artifactId>thymeleaf-spring6</artifactId>
<version>3.1.1.RELEASE</version>
</dependency>
|
配置视图解析器非常简单,我们只需要将对应的ViewResolver注册为Bean即可,这里我们直接在配置类中编写:
1
2
3
4
5
6
7
8
9
10
11
12
13
14
15
16
17
18
19
20
21
22
23
24
25
26
27
28
29
30
31
32
33
|
@ComponentScan("com.she11f.controller")
@Configuration
@EnableWebMvc
@ComponentScan("com.she11f.controller")
public class WebConfiguration {
@Bean
public ThymeleafViewResolver thymeleafViewResolver(SpringTemplateEngine springTemplateEngine){
ThymeleafViewResolver resolver = new ThymeleafViewResolver();
resolver.setOrder(1);
resolver.setCharacterEncoding("UTF-8");
resolver.setTemplateEngine(springTemplateEngine);
return resolver;
}
@Bean
public SpringResourceTemplateResolver templateResolver(){
SpringResourceTemplateResolver resolver = new SpringResourceTemplateResolver();
resolver.setSuffix(".html");
resolver.setPrefix("/");
return resolver;
}
@Bean
public SpringTemplateEngine springTemplateEngine(ITemplateResolver resolver){
SpringTemplateEngine engine = new SpringTemplateEngine();
engine.setTemplateResolver(resolver);
return engine;
}
}
|
现在我们就完成了视图解析器的配置,我们接着来创建一个Controller,创建Controller也非常简单,只需在一个类上添加一个@Controller注解即可,它会被Spring扫描并自动注册为Controller类型的Bean,然后我们只需要在类中编写方法用于处理对应地址的请求即可:
1
2
3
4
5
6
7
8
9
| @Controller
public class HelloController {
@RequestMapping("/index")
public ModelAndView index(){
return new ModelAndView("index");
}
}
|
接着我们在类路径根目录下创建一个简单html文件:
1
2
3
4
5
6
7
8
9
10
| <!DOCTYPE html>
<html lang="en">
<head>
<meta charset="UTF-8">
<title>测试</title>
</head>
<body>
<p>欢迎来到GayHub全球最大同性交友网站</p>
</body>
</html>
|
我们会发现,打开浏览器之后就可以直接访问我们的HTML页面了
如果乱码了,在SpringResourceTemplateResolver这个bean中,添加三行set
1
2
3
| resolver.setTemplateMode("HTML5");
resolver.setCacheable(false);
resolver.setCharacterEncoding("utf-8");
|
我们在之前,使用Thymeleaf解析后端的一些数据时,需要通过Context进行传递,而使用SpringMvc后,数据我们可以直接向Model模型层进行提供:
1
2
3
4
5
6
| @RequestMapping(value = "/index")
public ModelAndView index(){
ModelAndView modelAndView = new ModelAndView("index");
modelAndView.getModel().put("name", "啊这");
return modelAndView;
}
|
@RequestMapping详解
前面我们已经了解了如何创建一个控制器来处理我们的请求,接着我们只需要在控制器添加一个方法用于处理对应的请求即可,之前我们需要完整地编写一个Servlet来实现,而现在我们只需要添加一个@RequestMapping即可实现,其实从它的名字我们也能得知,此注解就是将请求和处理请求的方法建立一个映射关系,当收到请求时就可以根据映射关系调用对应的请求处理方法,那么我们就来先聊聊@RequestMapping吧,注解定义如下
1
2
3
4
5
6
7
8
9
10
11
12
13
14
15
16
17
18
19
20
| @Mapping
public @interface RequestMapping {
String name() default "";
@AliasFor("path")
String[] value() default {};
@AliasFor("value")
String[] path() default {};
RequestMethod[] method() default {};
String[] params() default {};
String[] headers() default {};
String[] consumes() default {};
String[] produces() default {};
}
|
其中最关键的是path属性(等价于value),它决定了当前方法处理的请求路径,注意路径必须全局唯一,任何路径只能有一个方法进行处理,它是一个数组,也就是说此方法不仅仅可以只用于处理某一个请求路径,我们可以使用此方法处理多个请求路径:
1
2
3
4
| @RequestMapping({"/index", "/test"})
public ModelAndView index(){
return new ModelAndView("index");
}
|
现在我们访问/index或是/test都会经过此方法进行处理。
我们也可以直接将@RequestMapping添加到类名上,表示为此类中的所有请求映射添加一个路径前缀,比如:
1
2
3
4
5
6
7
8
9
| @Controller
@RequestMapping("/yyds")
public class MainController {
@RequestMapping({"/index", "/test"})
public ModelAndView index(){
    return new ModelAndView("index");
}
}
|
那么现在我们需要访问/yyds/index或是/yyds/test才可以得到此页面。我们可以直接在IDEA下方的端点板块中查看当前Web应用程序定义的所有请求映射,并且可以通过IDEA为我们提供的内置Web客户端直接访问某个路径。
路径还支持使用通配符进行匹配:
- ?:表示任意一个字符,比如
@RequestMapping("/index/x?")可以匹配/index/xa、/index/xb等等。
- *:表示任意0-n个字符,比如
@RequestMapping("/index/*")可以匹配/index/lbwnb、/index/yyds等。
- **:表示当前目录或基于当前目录的多级目录,比如
@RequestMapping("/index/**")可以匹配/index、/index/xxx等。
我们接着来看下一个method属性,顾名思义,它就是请求的方法类型,我们可以限定请求方式,比如:
1
2
3
4
| @RequestMapping(value = "/index", method = RequestMethod.POST)
public ModelAndView index(){
return new ModelAndView("index");
}
|
现在我们如果直接使用浏览器访问此页面,会显示405方法不支持,因为浏览器默认是直接使用GET方法获取页面,而我们这里指定为POST方法访问此地址,所以访问失败,我们现在再去端点中用POST方式去访问,成功得到页面。
我们也可以使用衍生注解直接设定为指定类型的请求映射:
1
2
3
4
| @PostMapping(value = "/index")
public ModelAndView index(){
return new ModelAndView("index");
}
|
这里使用了@PostMapping直接指定为POST请求类型的请求映射,同样的,还有@GetMapping可以直接指定为GET请求方式,这里就不一一列举了。
我们可以使用params属性来指定请求必须携带哪些请求参数,比如:
1
2
3
4
| @RequestMapping(value = "/index", params = {"username", "password"})
public ModelAndView index(){
return new ModelAndView("index");
}
|
比如这里我们要求请求中必须携带username和password属性,否则无法访问。它还支持表达式,比如我们可以这样编写:
1
2
3
4
| @RequestMapping(value = "/index", params = {"!username", "password"})
public ModelAndView index(){
return new ModelAndView("index");
}
|
在username之前添加一个感叹号表示请求的不允许携带此参数,否则无法访问,我们甚至可以直接设定一个固定值:
1
2
3
4
| @RequestMapping(value = "/index", params = {"username!=test", "password=123"})
public ModelAndView index(){
return new ModelAndView("index");
}
|
这样,请求参数username不允许为test,并且password必须为123,否则无法访问。
header属性用法与params一致,但是它要求的是请求头中需要携带什么内容,比如:
1
2
3
4
| @RequestMapping(value = "/index", headers = "!Connection")
public ModelAndView index(){
return new ModelAndView("index");
}
|
那么,如果请求头中携带了Connection属性,将无法访问。其他两个属性:
- consumes: 指定处理请求的提交内容类型(Content-Type),例如application/json, text/html;
- produces: 指定返回的内容类型,仅当request请求头中的(Accept)类型中包含该指定类型才返回;
我们接着来看,如何获取到请求中的参数。
我们只需要为方法添加一个形式参数,并在形式参数前面添加@RequestParam注解即可:
1
2
3
4
5
| @RequestMapping(value = "/index")
public ModelAndView index(@RequestParam("username") String username){
System.out.println("接受到请求参数:"+username);
return new ModelAndView("index");
}
|
我们需要在@RequestParam中填写参数名称,参数的值会自动传递给形式参数,我们可以直接在方法中使用,注意,如果参数名称与形式参数名称相同,即使不添加@RequestParam也能获取到参数值。
一旦添加@RequestParam,那么此请求必须携带指定参数,我们也可以将require属性设定为false来将属性设定为非必须:
1
2
3
4
5
| @RequestMapping(value = "/index")
public ModelAndView index(@RequestParam(value = "username", required = false) String username){
System.out.println("接受到请求参数:"+username);
return new ModelAndView("index");
}
|
我们还可以直接设定一个默认值,当请求参数缺失时,可以直接使用默认值:
1
2
3
4
5
| @RequestMapping(value = "/index")
public ModelAndView index(@RequestParam(value = "username", required = false, defaultValue = "伞兵一号") String username){
System.out.println("接受到请求参数:"+username);
return new ModelAndView("index");
}
|
如果需要使用Servlet原本的一些类,比如:
1
2
3
4
5
| @RequestMapping(value = "/index")
public ModelAndView index(HttpServletRequest request){
System.out.println("接受到请求参数:"+request.getParameterMap().keySet());
return new ModelAndView("index");
}
|
直接添加HttpServletRequest为形式参数即可,SpringMVC会自动传递该请求原本的HttpServletRequest对象,同理,我们也可以添加HttpServletResponse作为形式参数,甚至可以直接将HttpSession也作为参数传递:
1
2
3
4
5
6
| @RequestMapping(value = "/index")
public ModelAndView index(HttpSession session){
System.out.println(session.getAttribute("test"));
session.setAttribute("test", "鸡你太美");
return new ModelAndView("index");
}
|
我们还可以直接将请求参数传递给一个实体类:
1
2
3
4
5
| @Data
public class User {
String username;
String password;
}
|
注意必须携带set方法或是构造方法中包含所有参数,请求参数会自动根据类中的字段名称进行匹配:
1
2
3
4
5
| @RequestMapping(value = "/index")
public ModelAndView index(User user){
System.out.println("获取到cookie值为:"+user);
return new ModelAndView("index");
}
|
@RequestHeader与@RequestParam用法一致,不过它是用于获取请求头参数的,这里就不再演示了。
@CookieValue和@SessionAttrbutie
通过使用@CookieValue注解,我们也可以快速获取请求携带的Cookie信息:
1
2
3
4
5
6
7
8
| @RequestMapping("/cookie")
public ModelAndView index(HttpServletResponse response, @CookieValue(value = "test",required = false) String test){
ModelAndView modelAndView = new ModelAndView("index");
response.addCookie(new Cookie("test","lbwnb"));
System.out.println("获取到cookie值为:"+test);
return modelAndView;
}
|
同样的,Session也能使用注解快速获取:
1
2
3
4
5
6
7
8
9
10
| @RequestMapping("/session")
public ModelAndView session(@SessionAttribute(value="test",required = false) String test, HttpSession session){
session.setAttribute("test","admin");
System.out.println(test);
String username = (String) session.getAttribute("test");
System.out.println("Session 中的用户名:" + username);
return new ModelAndView("index");
}
|
可以发现,通过使用SpringMVC框架,整个Web应用程序的开发变得非常简单,大部分功能只需要一个注解就可以搞定了,正是得益于Spring框架,SpringMVC才能大显身手。
重定向和请求转发
重定向和请求转发也非常简单,我们只需要在视图名称前面添加一个前缀即可,比如重定向:
1
2
3
4
| @GetMapping("/redirect")
public String redirect(){
return "redirect:/test/cookie";
}
|
通过添加redirect:前缀,就可以很方便地实现重定向,那么请求转发呢,其实也是一样的,使用forward:前缀表示转发给其他请求映射:
1
2
3
4
| @GetMapping("forward")
public String forward(){
return "forward:/test/cookie";
}
|
使用SpringMVC,只需要一个前缀就可以实现重定向和请求转发,非常方便。
RestFul风格
中文释义为“表现层状态转换”(名字挺高大上的),它不是一种标准,而是一种设计风格。它的主要作用是充分并正确利用HTTP协议的特性,规范资源获取的URI路径。通俗的讲,RESTful风格的设计允许将参数通过URL拼接传到服务端,目的是让URL看起来更简洁实用,并且我们可以充分使用多种HTTP请求方式(POST/GET/PUT/DELETE),来执行相同请求地址的不同类型操作。
因此,这种风格的连接,我们就可以直接从请求路径中读取参数,比如:
我们可以直接将index的下一级路径作为请求参数进行处理,也就是说现在的请求参数包含在了请求路径中,注意请求路径我们可以手动添加类似占位符一样的信息,这样占位符位置的所有内容都会被作为请求参数,而方法的形参列表中必须包括一个与占位符同名的并且添加了@PathVariable注解的参数,或是由@PathVariable注解指定为占位符名称:
1
2
3
4
5
| @GetMapping("/restful/{str}")
public String restful(@PathVariable String str){
System.out.println(str);
return "index";
}
|
如果没有配置正确,方法名称上会出现黄线。
我们可以按照不同功能进行划分:
我们分别编写四个请求映射:
1
2
3
4
5
6
7
8
9
10
11
12
13
14
15
16
17
18
19
20
21
22
23
24
25
26
27
| @Controller
public class MainController {
@RequestMapping(value = "/index/{id}", method = RequestMethod.GET)
public String get(@PathVariable("id") String text){
System.out.println("获取用户:"+text);
return "index";
}
@RequestMapping(value = "/index", method = RequestMethod.POST)
public String post(String username){
System.out.println("添加用户:"+username);
return "index";
}
@RequestMapping(value = "/index/{id}", method = RequestMethod.DELETE)
public String delete(@PathVariable("id") String text){
System.out.println("删除用户:"+text);
return "index";
}
@RequestMapping(value = "/index", method = RequestMethod.PUT)
public String put(String username){
System.out.println("修改用户:"+username);
return "index";
}
}
|
Interceptor拦截器
拦截器是整个SpringMVC的一个重要内容,拦截器与过滤器类似,都是用于拦截一些非法请求,但是我们之前讲解的过滤器是作用于Servlet之前,只有经过层层的过滤器才可以成功到达Servlet,而拦截器并不是在Servlet之前,它在Servlet与RequestMapping之间,相当于DispatcherServlet在将请求交给对应Controller中的方法之前进行拦截处理,它只会拦截所有Controller中定义的请求映射对应的请求(不会拦截静态资源),这里一定要区分两者的不同。
创建拦截器
创建一个拦截器我们需要实现一个HandlerInterceptor接口:
1
2
3
4
5
6
7
8
9
10
11
12
13
14
15
16
17
18
| public class MainInterceptor implements HandlerInterceptor {
@Override
public boolean preHandle(HttpServletRequest request, HttpServletResponse response, Object handler) throws Exception {
System.out.println("我是处理之前!");
return true;
}
@Override
public void postHandle(HttpServletRequest request, HttpServletResponse response, Object handler, ModelAndView modelAndView) throws Exception {
System.out.println("我是处理之后!");
}
@Override
public void afterCompletion(HttpServletRequest request, HttpServletResponse response, Object handler, Exception ex) throws Exception {
System.out.println("我是完成之后!");
}
}
|
接着我们需要在配置类中进行注册:
1
2
3
4
5
6
| @Override
public void addInterceptors(InterceptorRegistry registry) {
registry.addInterceptor(new MainInterceptor())
.addPathPatterns("/**")
.excludePathPatterns("/home");
}
|
现在我们在浏览器中访问index页面,拦截器已经生效。
得到整理拦截器的执行顺序:
1
2
3
4
| 我是处理之前!
我是处理!
我是处理之后!
我是完成之后!
|